
Your PBX server requires some network changes to facilitate phone calls to your SIP provider. We will be setting up a NAT or PAT on your router, then make some rules to allow the traffic into your PBX, then finish up some advanced settings on your FreePBX system.
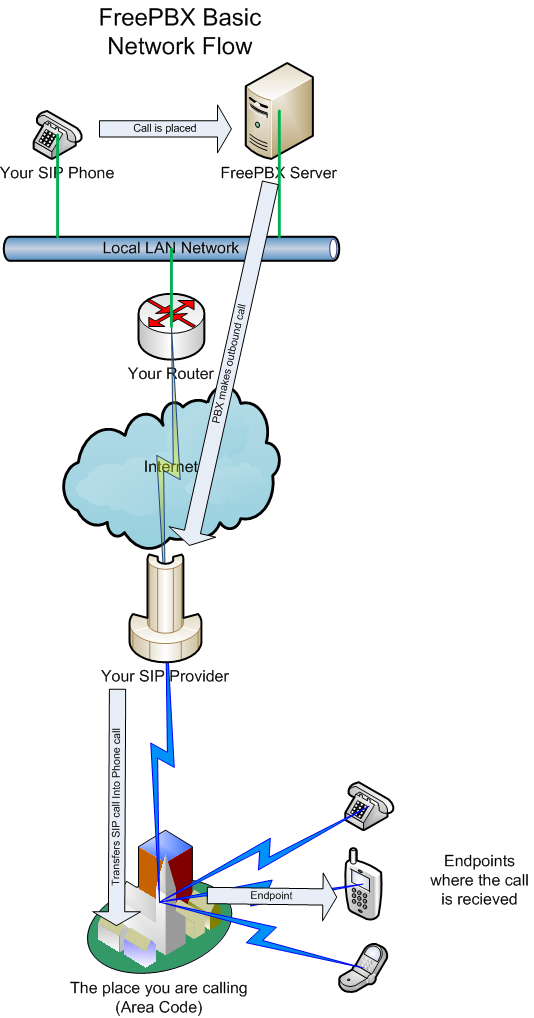
Let’s start with understanding what needs to happen to make a phone call using your PBX.
See the picture below:
NAT / PAT
We will need to setup a NAT or PAT to get traffic from your SIP provider to your PBX.
NAT – 1:1 – This is a good option if you have a static IP address to dedicate to the PBX server
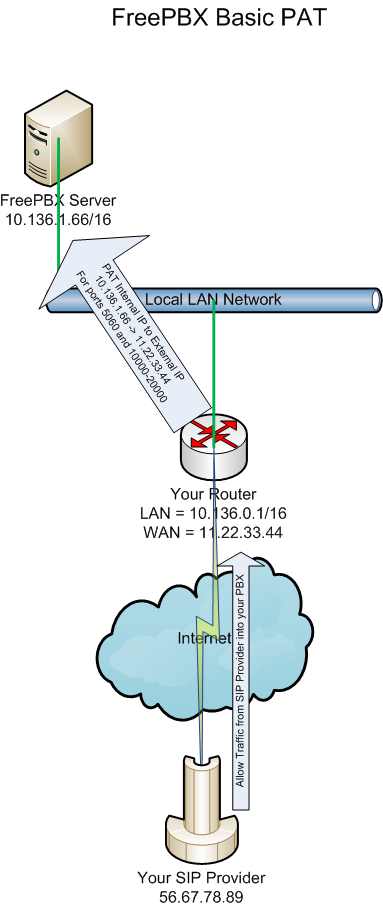
PAT – Port Translation – This is a good option if you only have one static IP address.
I will be using a pfSense virtualized firewall as my router, but will provide the equivalent Cisco commands also.
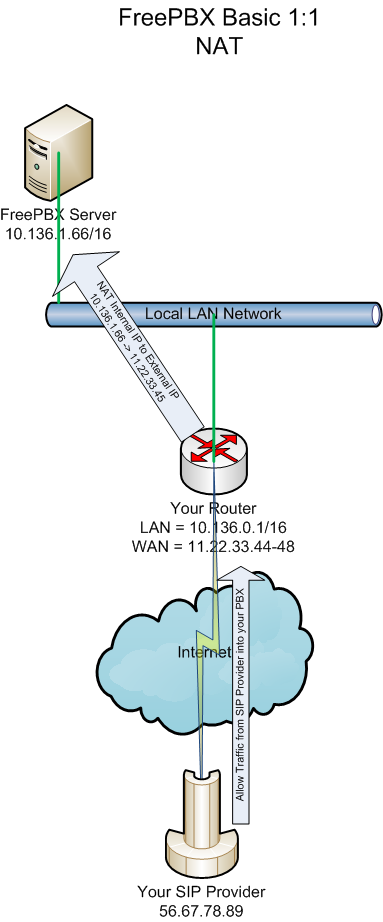
Setting up NAT (1:1) pfSense
(Optional) If you have multiple static IP WAN addresses, setup a 1:1 NAT.
1.
Log into your router.
2.
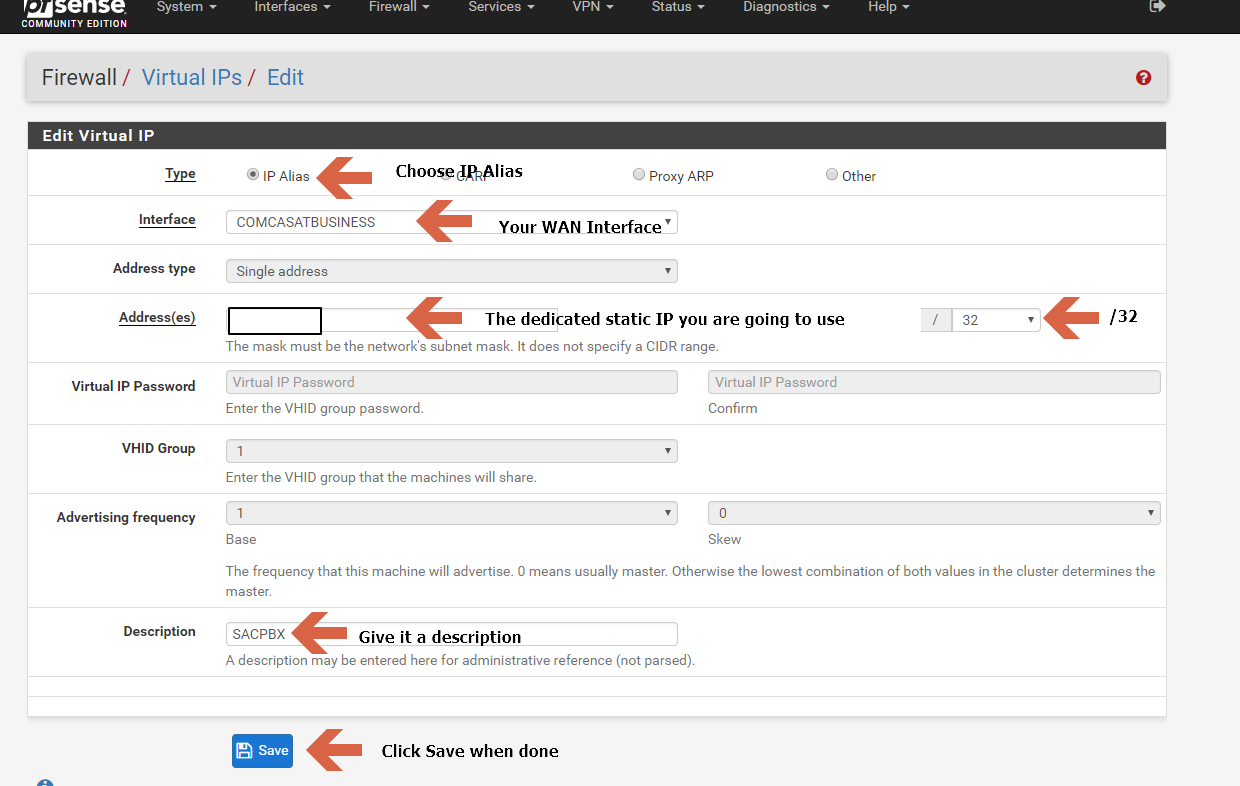
Now go to Firewall / Virtual IPs:
- Click Add on the bottom
- Select “IP Alias” at the top
- Interface: Your WAN Interface
- Address(es): This is the dedicated Static IP you are going to use for your PBX.
- Leave the subnet mask at /32
- Description: Your IP Alias description.
- Hit SAVE when done.
3.
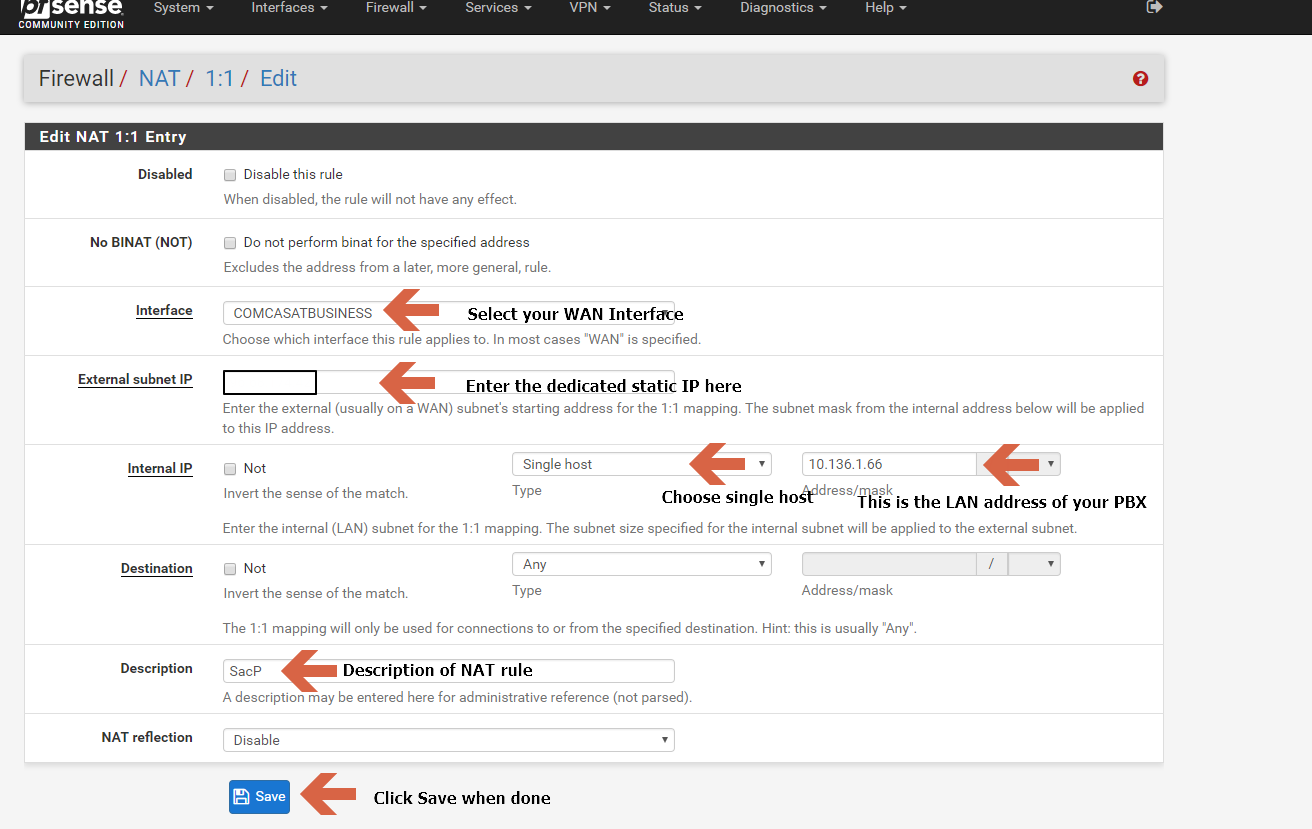
Now go to Firewall / NAT and select 1:1 at the top.
4.
Edit the 1:1 NAT Entry:
- Click Add:
- Interface: Select WAN interface
- External subnet IP: This is the dedicated static IP WAN address you made an alias for above.
- Internal IP: Select Single Host and enter the LAN address of your PBX server.
- Description: NAT description
- Click Save when done.
Setting Up PAT (Port Address Translation) pfSense:
(Optional) If you have one static IP WAN address, setup PAT instead.
1.
Log into your router.
2.
Go to Firewall / NAT and select Port Forward at the top.
3.
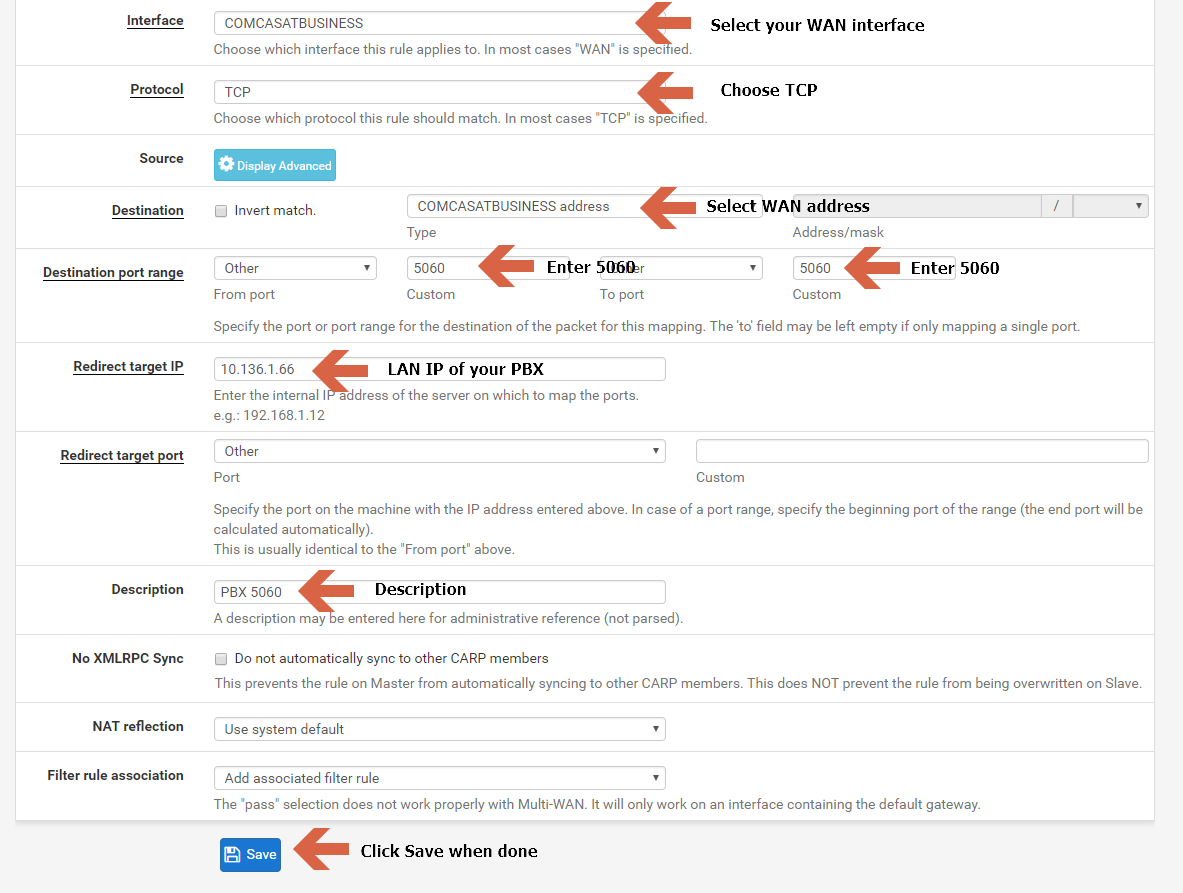
Click Add:
- Interface: Choose your WAN interface from the dropdown menu.
- Protocol: Choose TCP.
- Destination: Select WAN address from dropdown menu.
- Destination Port Range: Enter 5060 in both boxes.
- Redirect target IP: Enter the LAN address of your PBX here.
- Description: Enter your PAT description.
- Click Save when done.
4.
Click Add again:
- Interface: Choose your WAN interface from the dropdown menu.
- Protocol: Choose UDP.
- Destination: Select WAN address from dropdown menu.
- Destination Port Range: Enter 10000 in the first box, then 20000 in the second box.
- Redirect target IP: Enter the LAN address of your PBX here.
- Description: Enter your PAT description.
- Click Save when done.
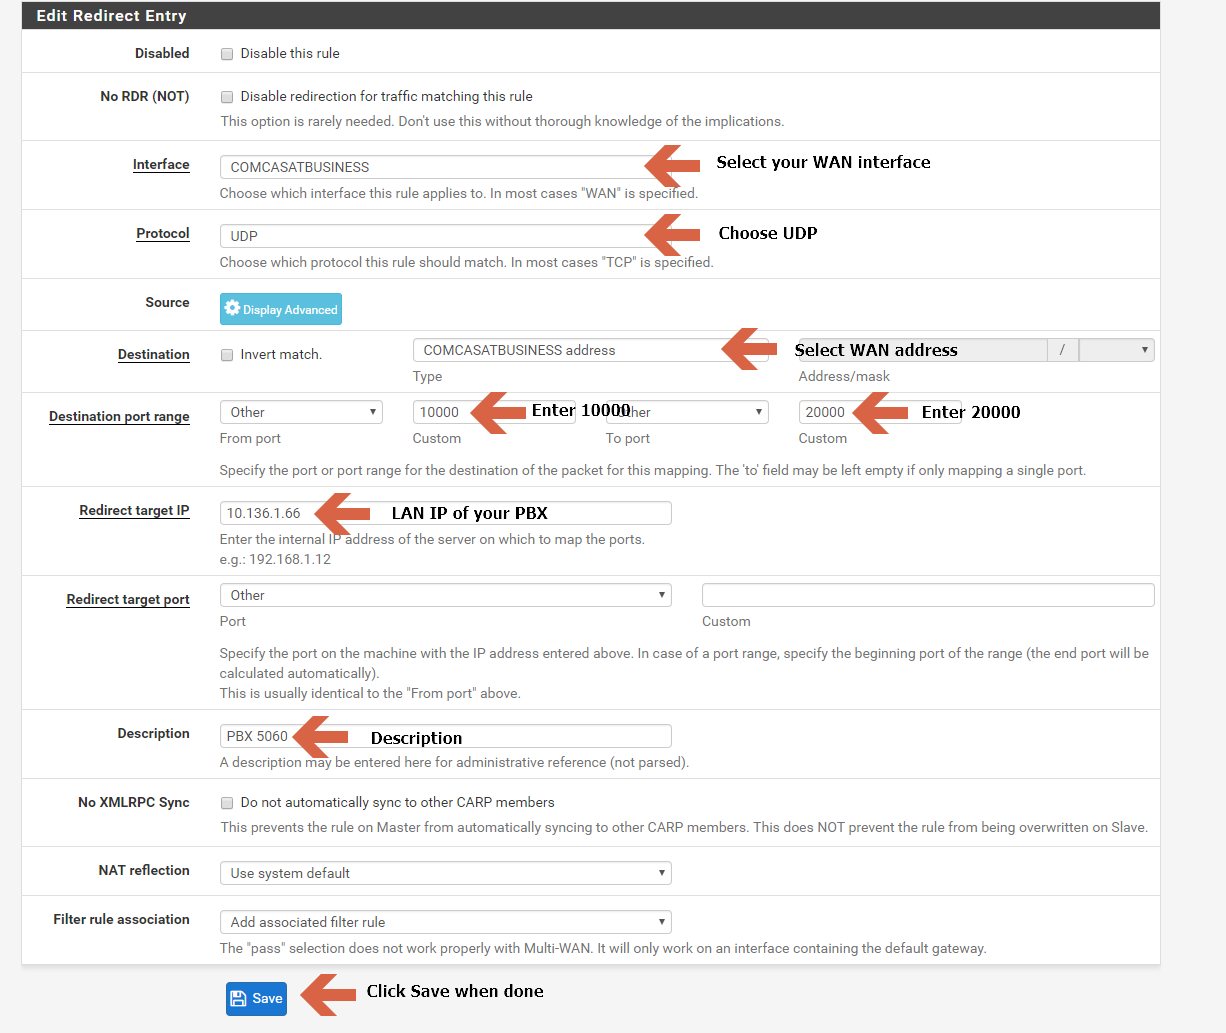
Now you should have two PAT rules in your firewall, one for SIP 5060/TCP and one for RTP 10000-20000/UDP.
Setting Up The Rules pfSense:
If you did NAT or PAT, you are going to have to setup some rules to allow traffic in.
1.
Log into your router.
2.
Make an Alias for your SIP Provider under Firewall / Aliases / IP:
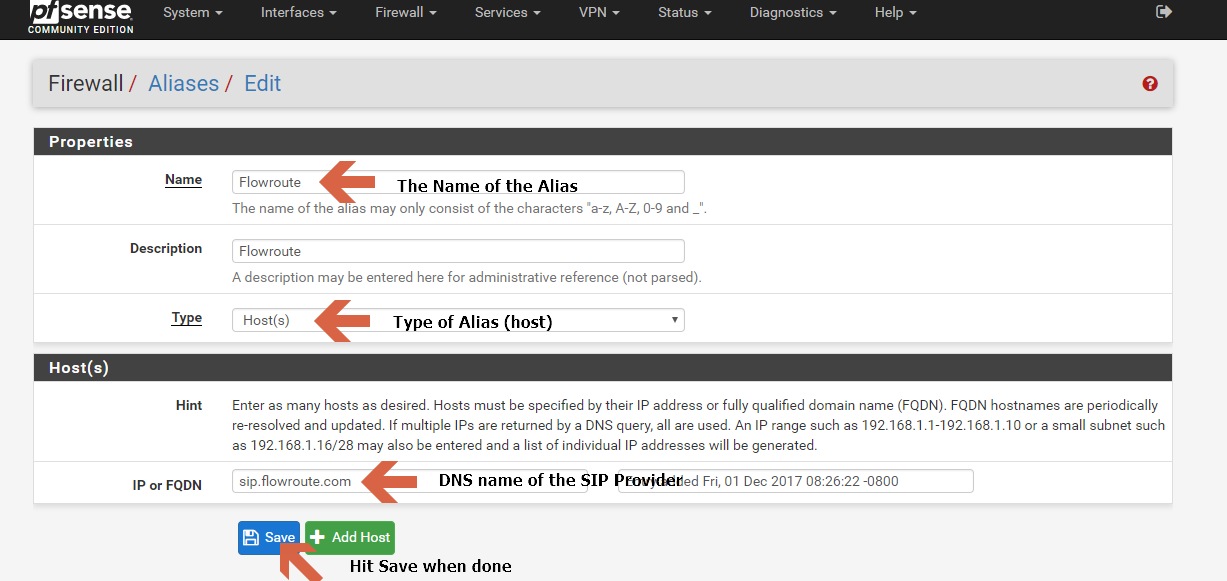
- Click Add at the bottom.
- Name: Name of the Alias
- Description: Description of the Alias
- Type: Choose “host(s)” from dropdown menu
- IP or FQDN: Put in your SIP provider’s DNS name
- Hit SAVE when done.
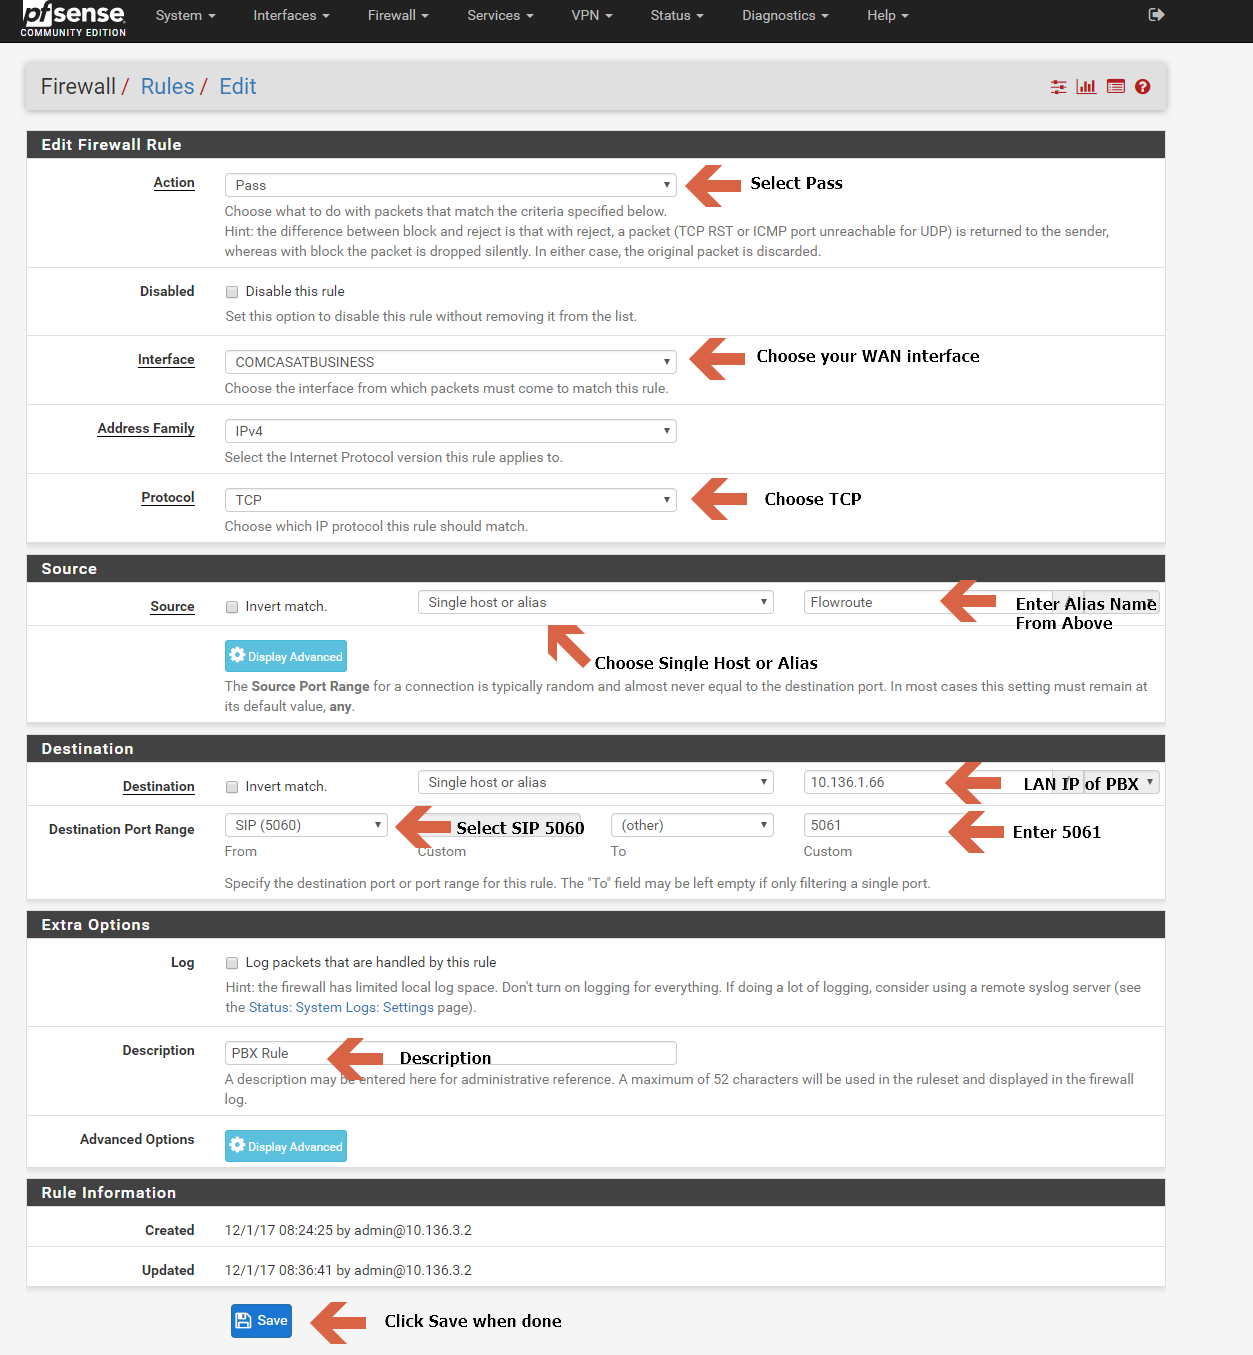
3.
Go to Firewall / Rules, select your WAN interface at the top and click Add:
- Action: Pass
- Interface: WAN Interface
- Protocol: TCP
- Source: Choose Single host or alias then type in the alias name from step above.
- Destination: Choose Single host or alias and type in your LAN IP of the PBX.
- Destination Port Range: Select SIP (5060) in the first port, then type in 5061 in the other box.
- Description: Rule description
- Click Save when done.
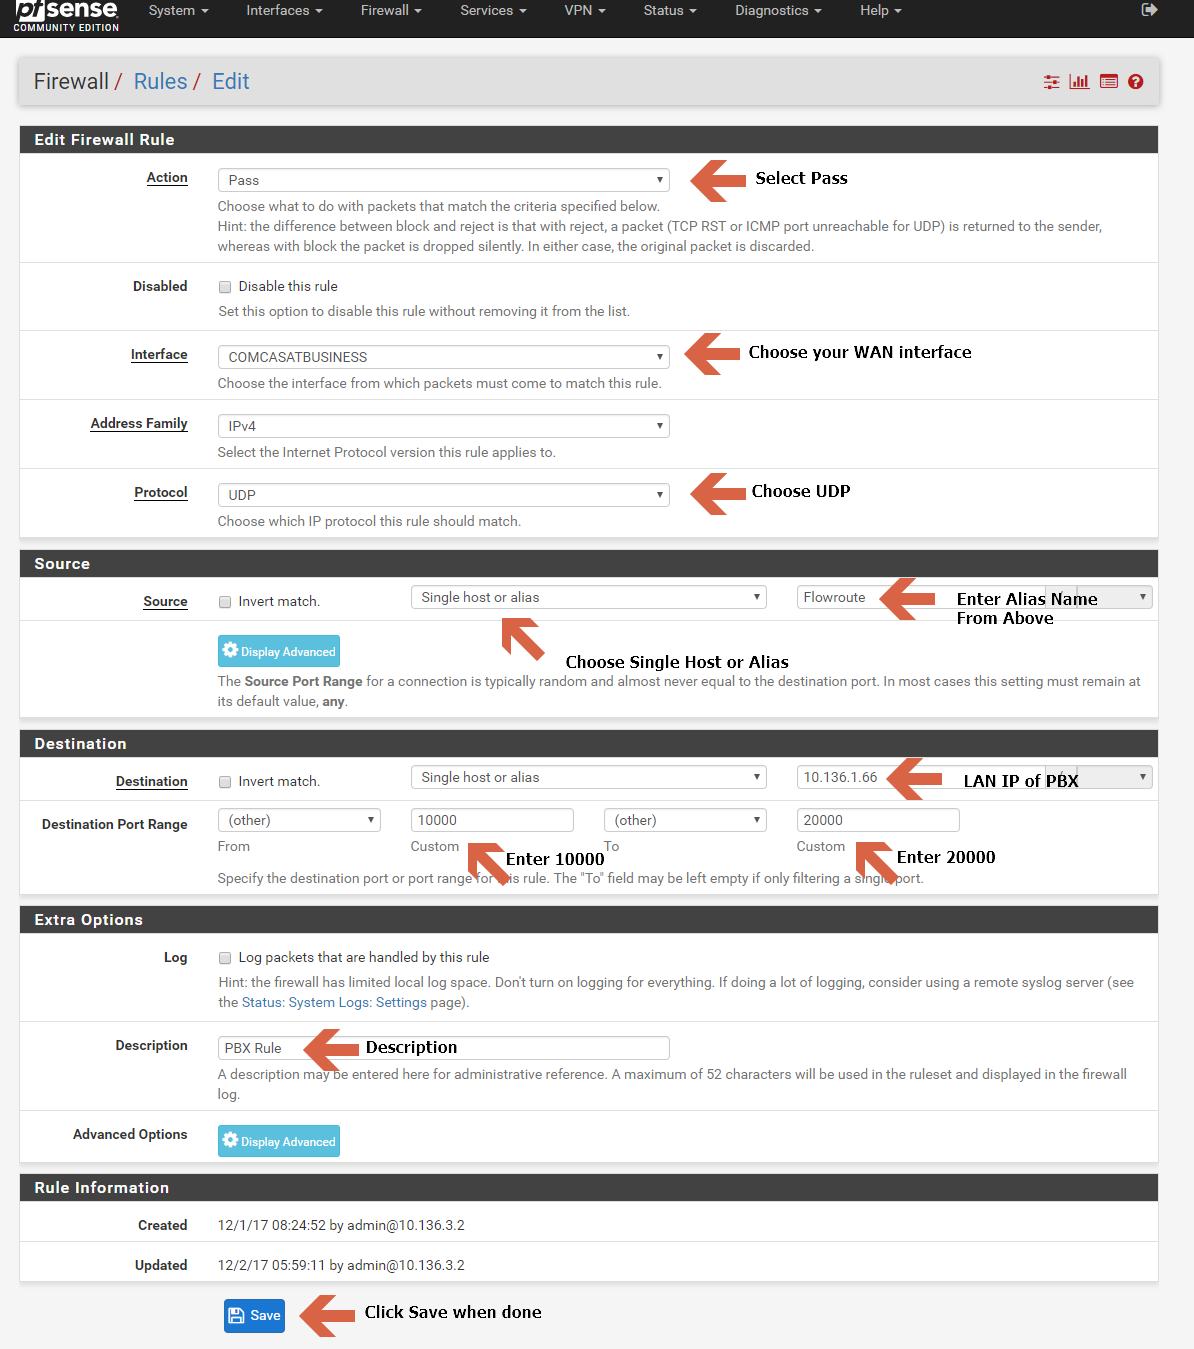
4.
Click Add again and create the RTP rule:
- Action: Pass
- Interface: WAN Interface
- Protocol: UDP
- Source: Choose Single host or alias then type in the alias name from step above.
- Destination: Choose Single host or alias and type in your LAN IP of the PBX.
- Destination Port Range: Type 10000 in the first box, then 20000 in the second box.
- Description: Rule description
- Click Save when done.
FreePBX Advanced Networking Configuration
Now let’s setup FreePBX to use chan_sip only and set the NAT in the interface. There are two SIP protocols that FreePBX ships with, Chan_SIP and PJSIP. The reason we want to disable pjsip is that I find it difficult to get phones to register using this protocol. Chan_sip is the legacy protocol and is easier to work with.
1.
Log into your PBX.
2.
Click Settings / Advanced Settings:
3.
Under Dialplan and Operational (half way down the page), change SIP Channel Driver from both to chan_sip:
- Find SIP Channel Driver and change to chan_sip.
- Click Submit when done.

4.
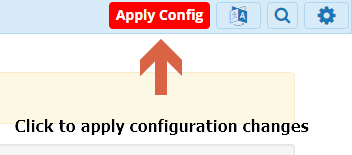
Apply that change by clicking the red Apply Config button on the top, right:
5.
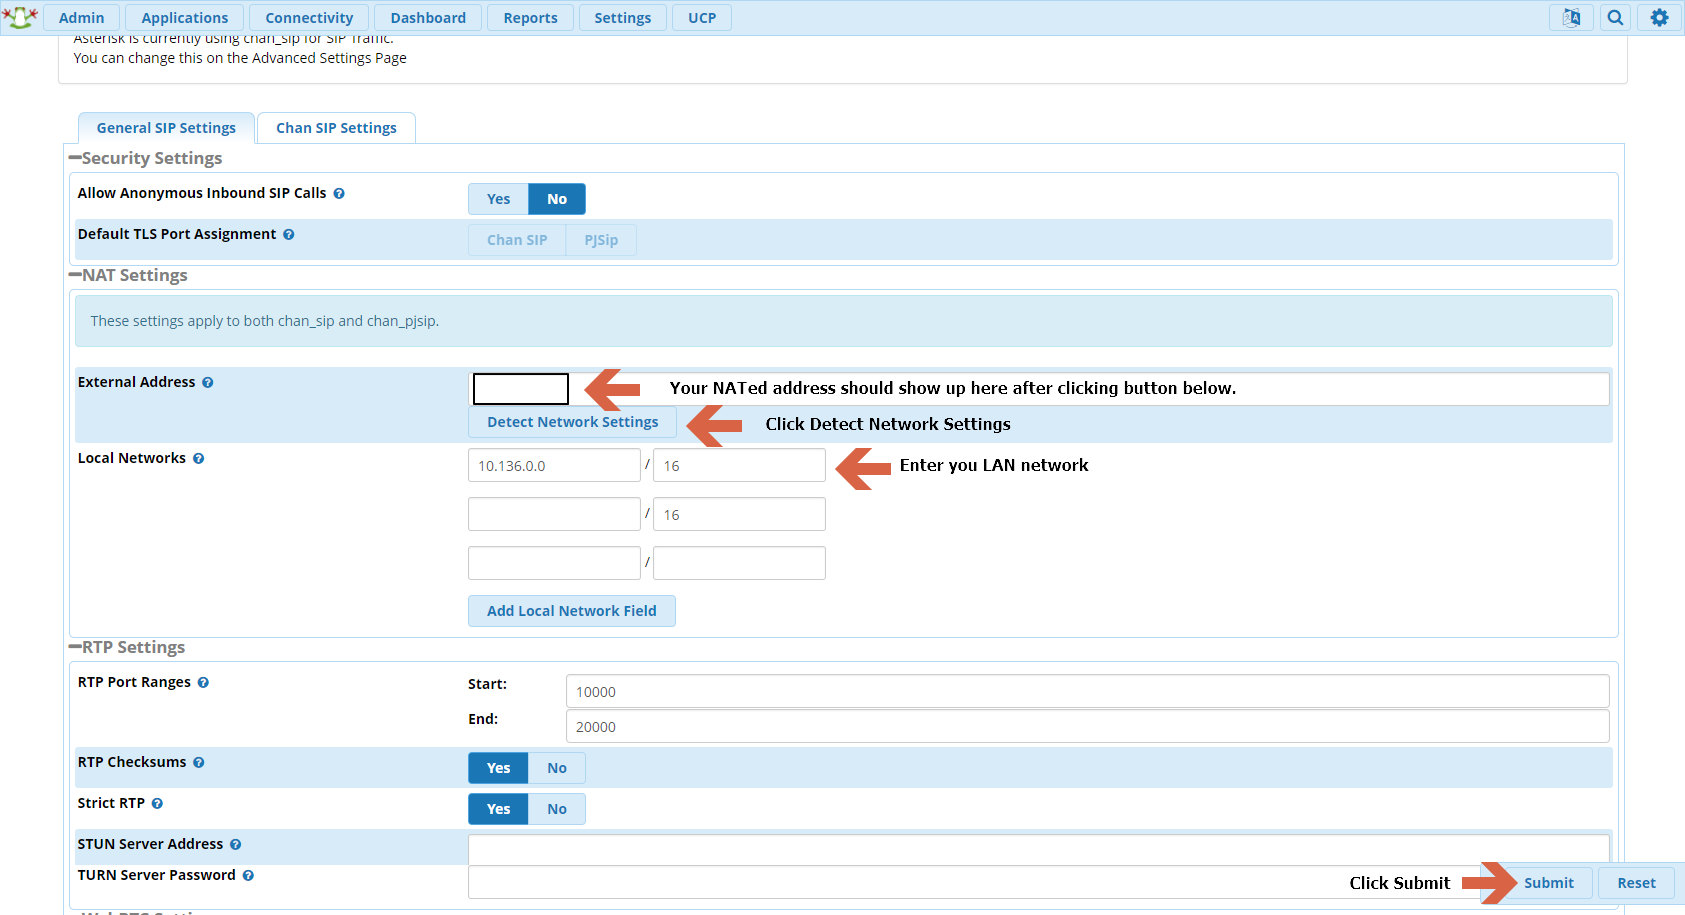
Now click Settings / Asterisk SIP Settings:
- External Address: Will auto-populate when “Detect Network Settings” is clicked below.
- Local Networks: Enter your LAN network here.
- Click Submit when completed.
6.
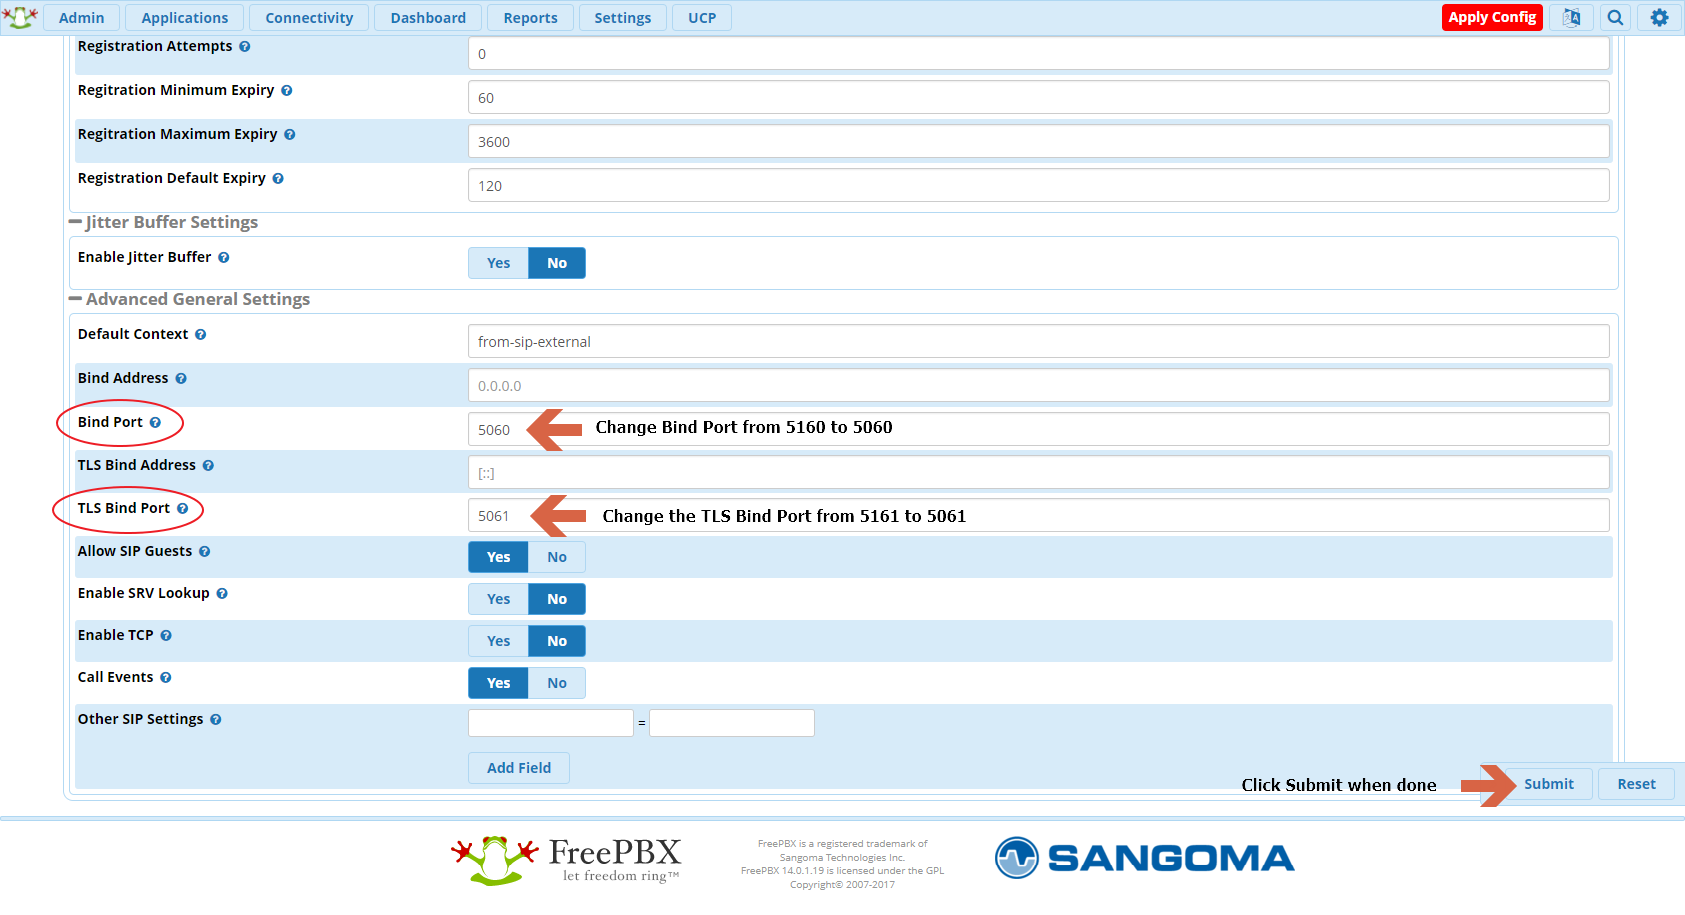
Now click the Chan SIP Setting tab at the top left of the pane:
- Bind Port: change from 5160 to 5060
- TLS Bind Port: change from 5161 to 5061
- Click Submit when done, click OK to any warnings.
7.
Apply these changes by clicking the red Apply Config button on the top, right:
We are done with the networking setup for FreePBX, let’s move on to Trunks, Extensions, and Routes.