
Now that we have networking setup, we can move onto setting up the rest of FreePBX. Let’s start by setting up a trunk to our SIP provider:
Trunks
A trunk is a connection to another PBX, in VOIP-Speak. This is a slightly different definition than when trunking is in Network-Speak, as many of the Telephony technologies are similar but most always different.
1.
Log into your PBX.
2.
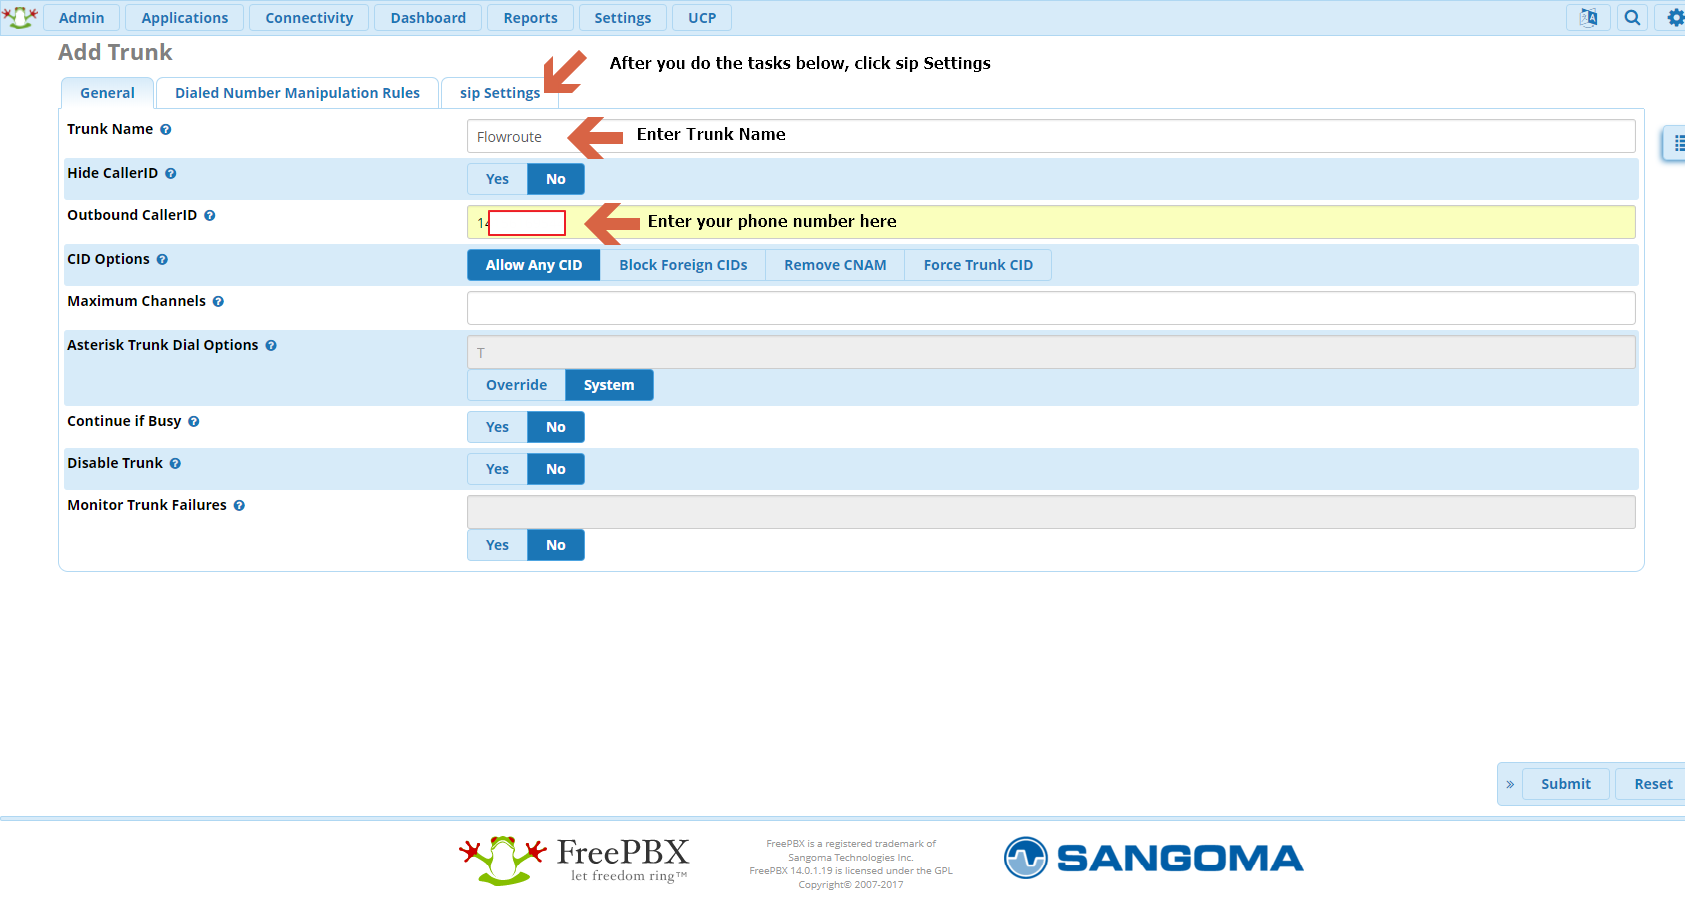
Under Connectivity / Trunks, click +Add Trunk and select +Add SIP (chan_sip) Trunk:
- Trunk Name: Give this a name you can remember that is relevant to the service.
- Outbound Caller ID: Put in your phone number from the SIP provider here, if you have purchased DIDs.
- Click the Sip Settings tab when done.
3.
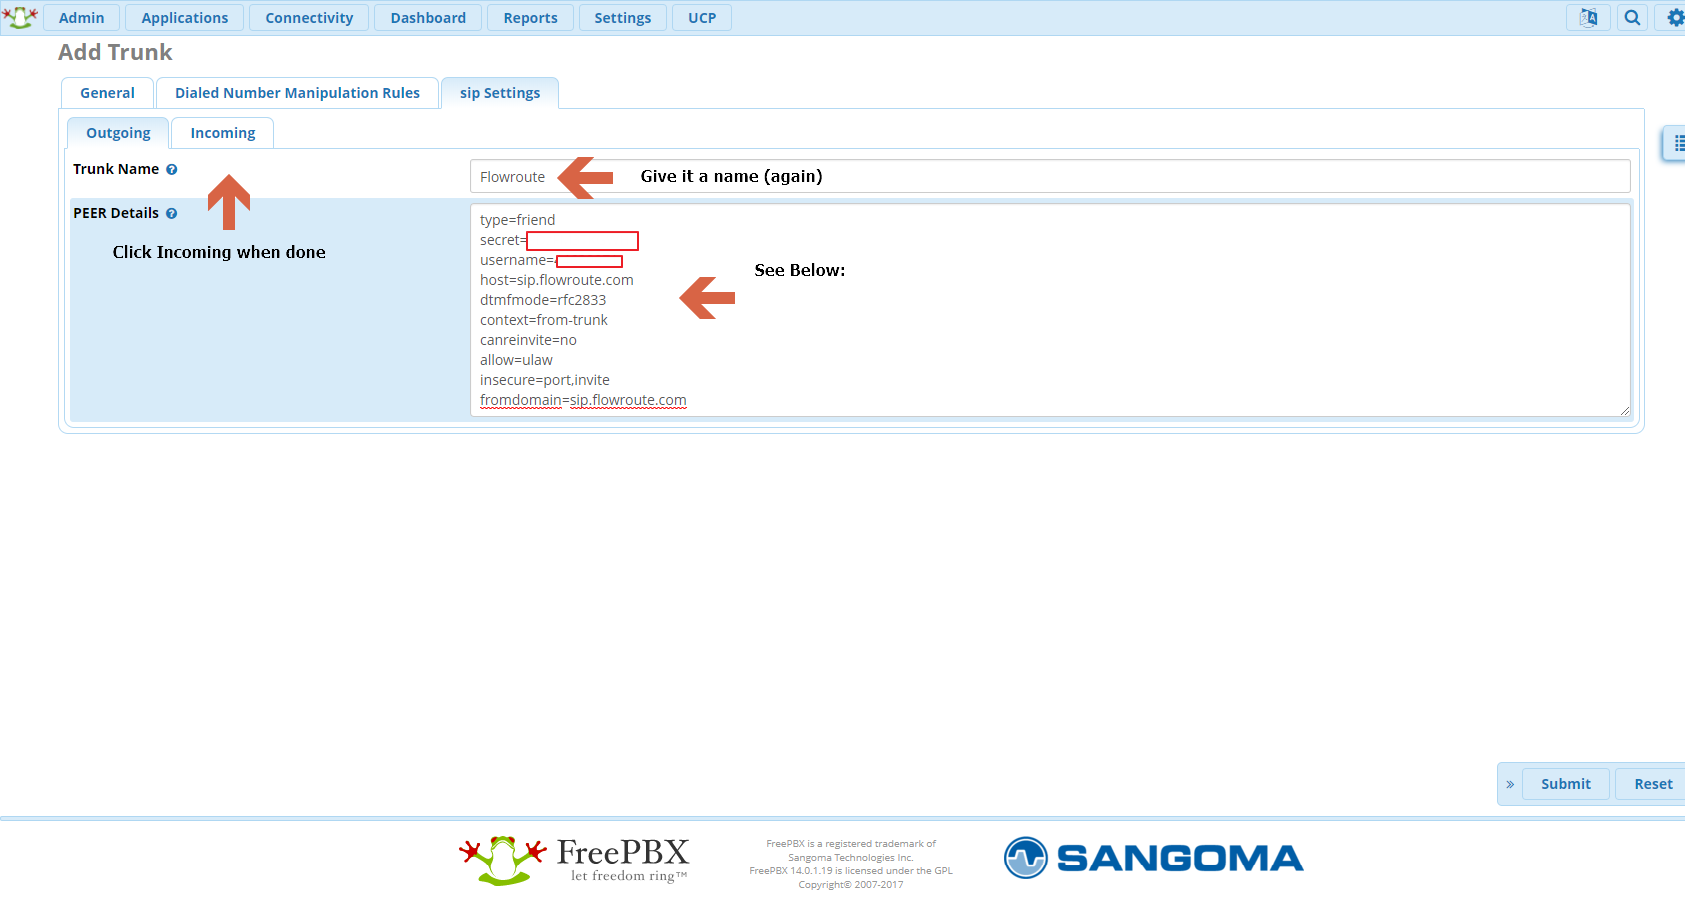
In the sip Settings tab:
- Trunk Name: Give it the same name as you did before.
- Peer Details: Replace everything here with this text:
type=friend
secret=<the password your SIP provider gave you>
username=<the username your SIP provider gave you>
host=<the service address that your SIP provider gave you>
dtmfmode=rfc2833
context=from-trunk
canreinvite=no
allow=ulaw
insecure=port,invite
fromdomain=<Your SIP provider’s address>
- Click the Incoming tab next:
4.
Incoming sip Settings:
- USER Details: Clear out any existing text.
- Register String: Put in <SIP Username>:<SIP Password>@<your SIP Provider.com> These values were used above.
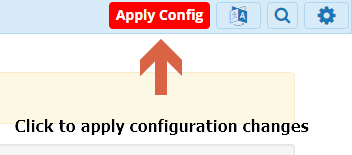
- Click Submit when done.

5.
Click Apply Config at the top right:
6.
Now go to Reports and select Asterisk Info.
7.
Select Chan_Sip Info at the right and see if your trunk has Registered with the SIP provider:

Extensions
Now that we have our trunk set, let’s setup an extension. An extension is an endpoint to where a call will “terminate” to, as well as a phone will register to.
1.
Log into your PBX.
2.
Go to Applications / Extensions in the PBX.
3.
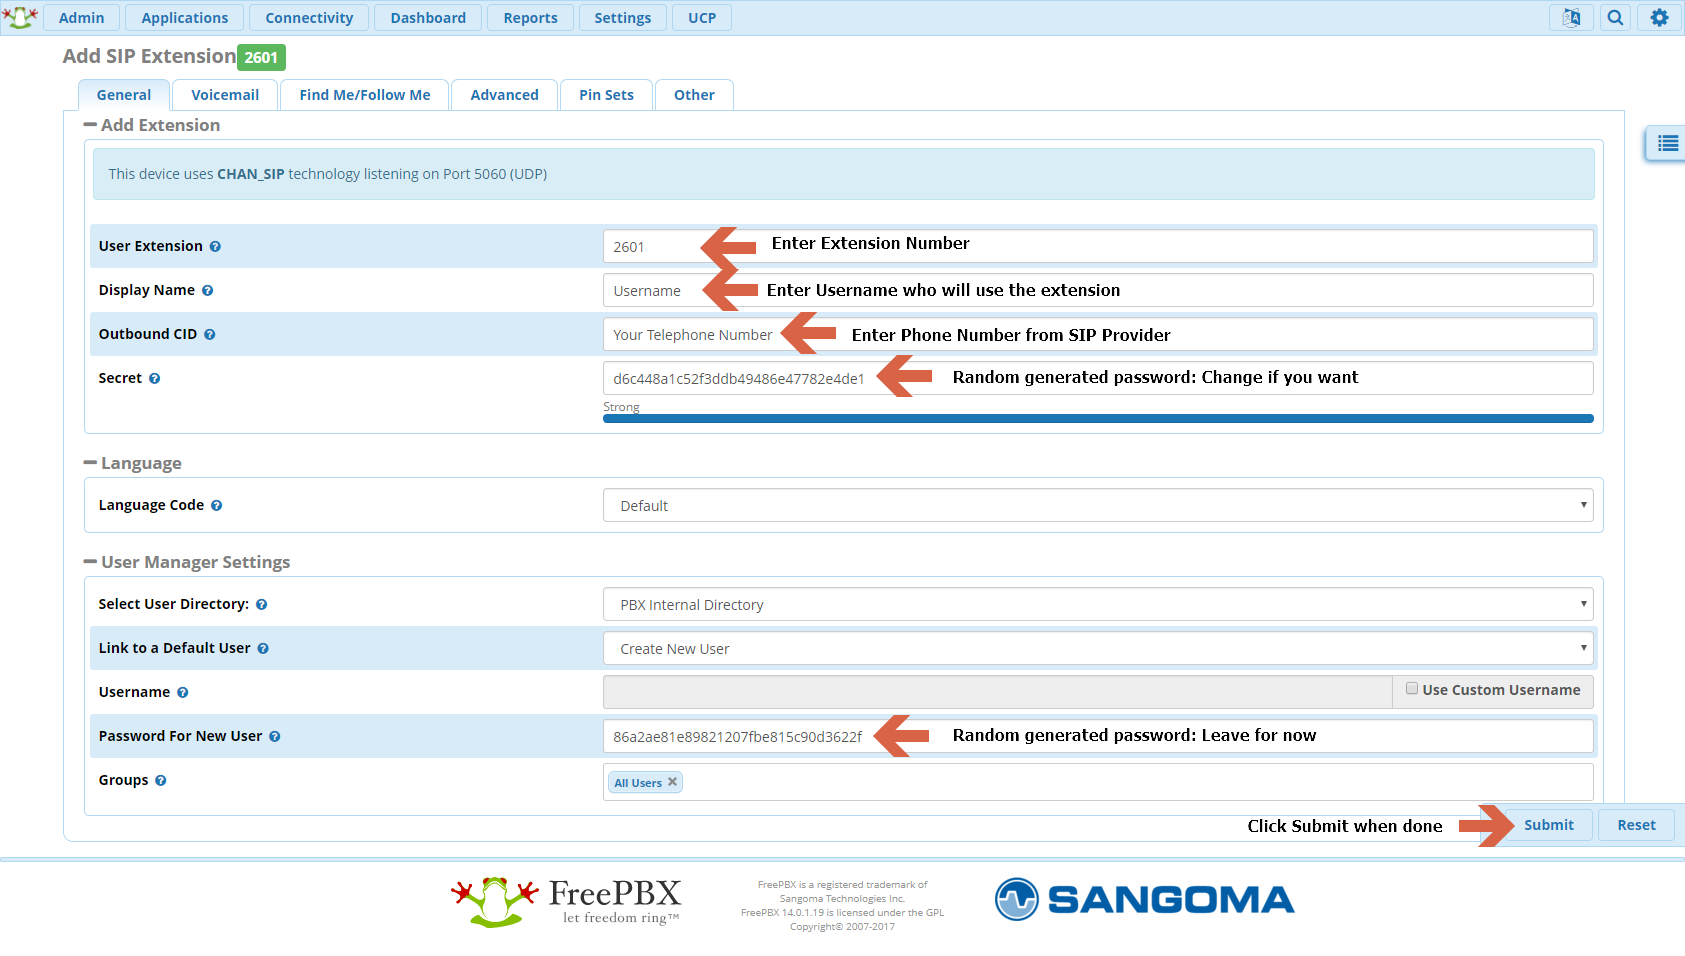
Click + Add Extension and select + Add New Chan_Sip Extension:
- Extension: Choose an extension number
- Display Name: Enter the user of this extension (or the purpose such as “Front Desk” or “Fax”)
- Outbound CID: Enter the Phone Number you got with your SIP Provider.
- Secret: This is randomly generated, I enter something easier to remember. This will be used as the password to register phones to this extension.
- Password For New User: This is also randomly generated, leave this for now.
- Click Submit when done.
4.
Add more extensions as needed.
5.
Click Apply Config at the top right when you are done:
6.
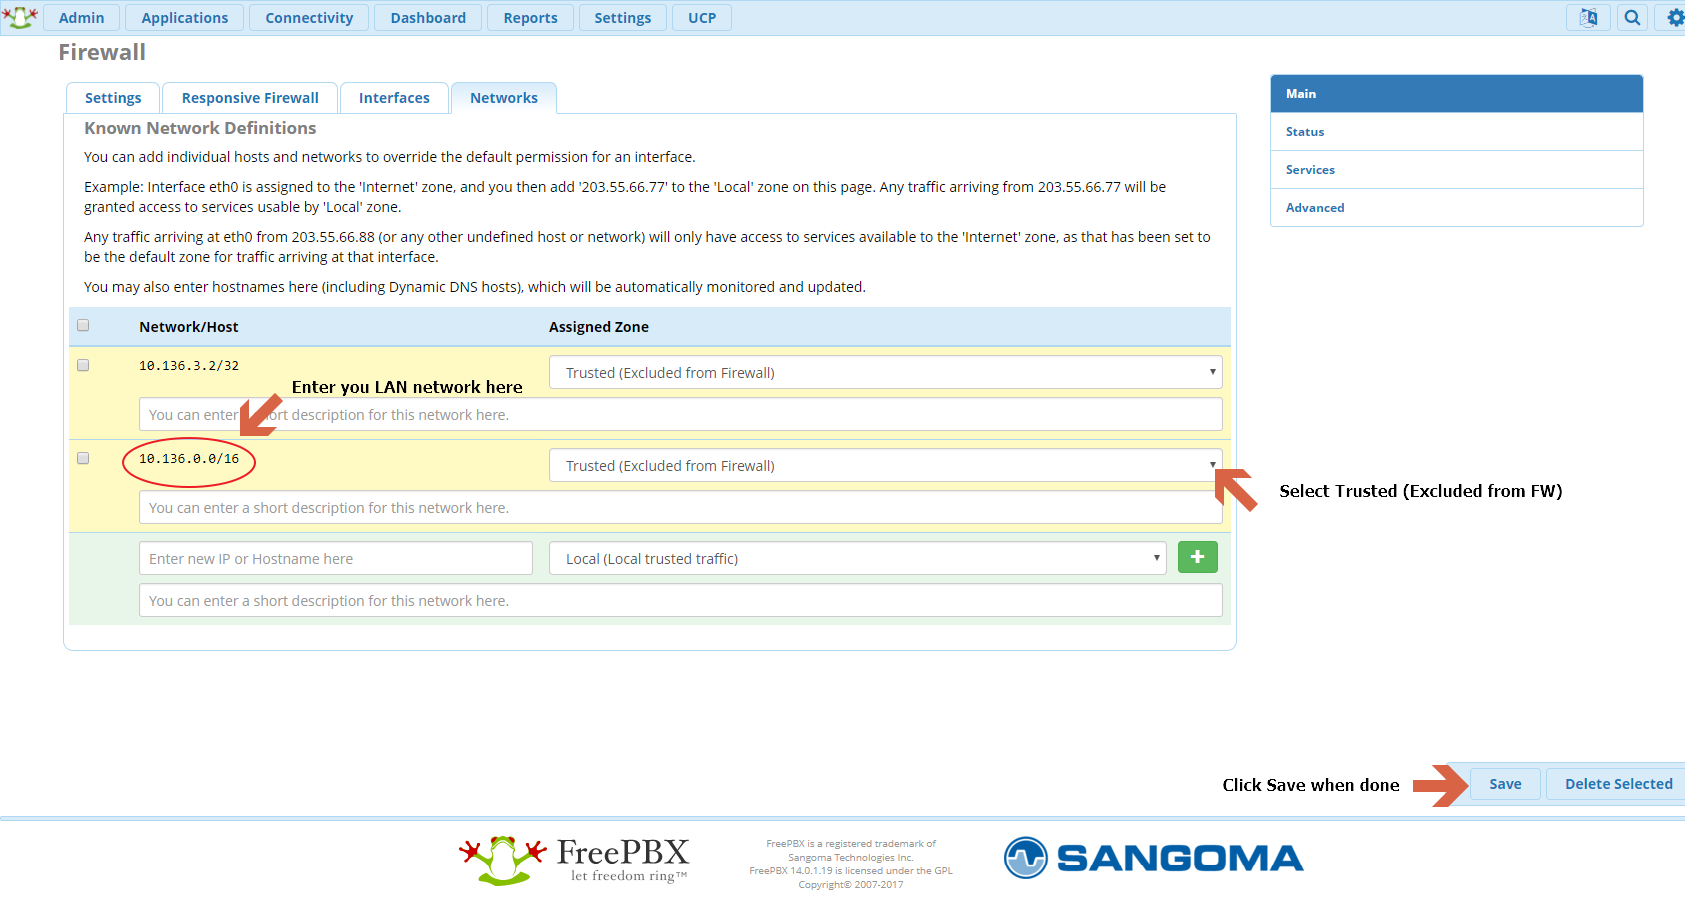
Now click Connectivity / Firewall and choose the Network tab:
- Enter new IP or Hostname here: Enter your LAN network IP here.
- Select Trusted (Excluded from Firewall)
- Click Save when done.
7.
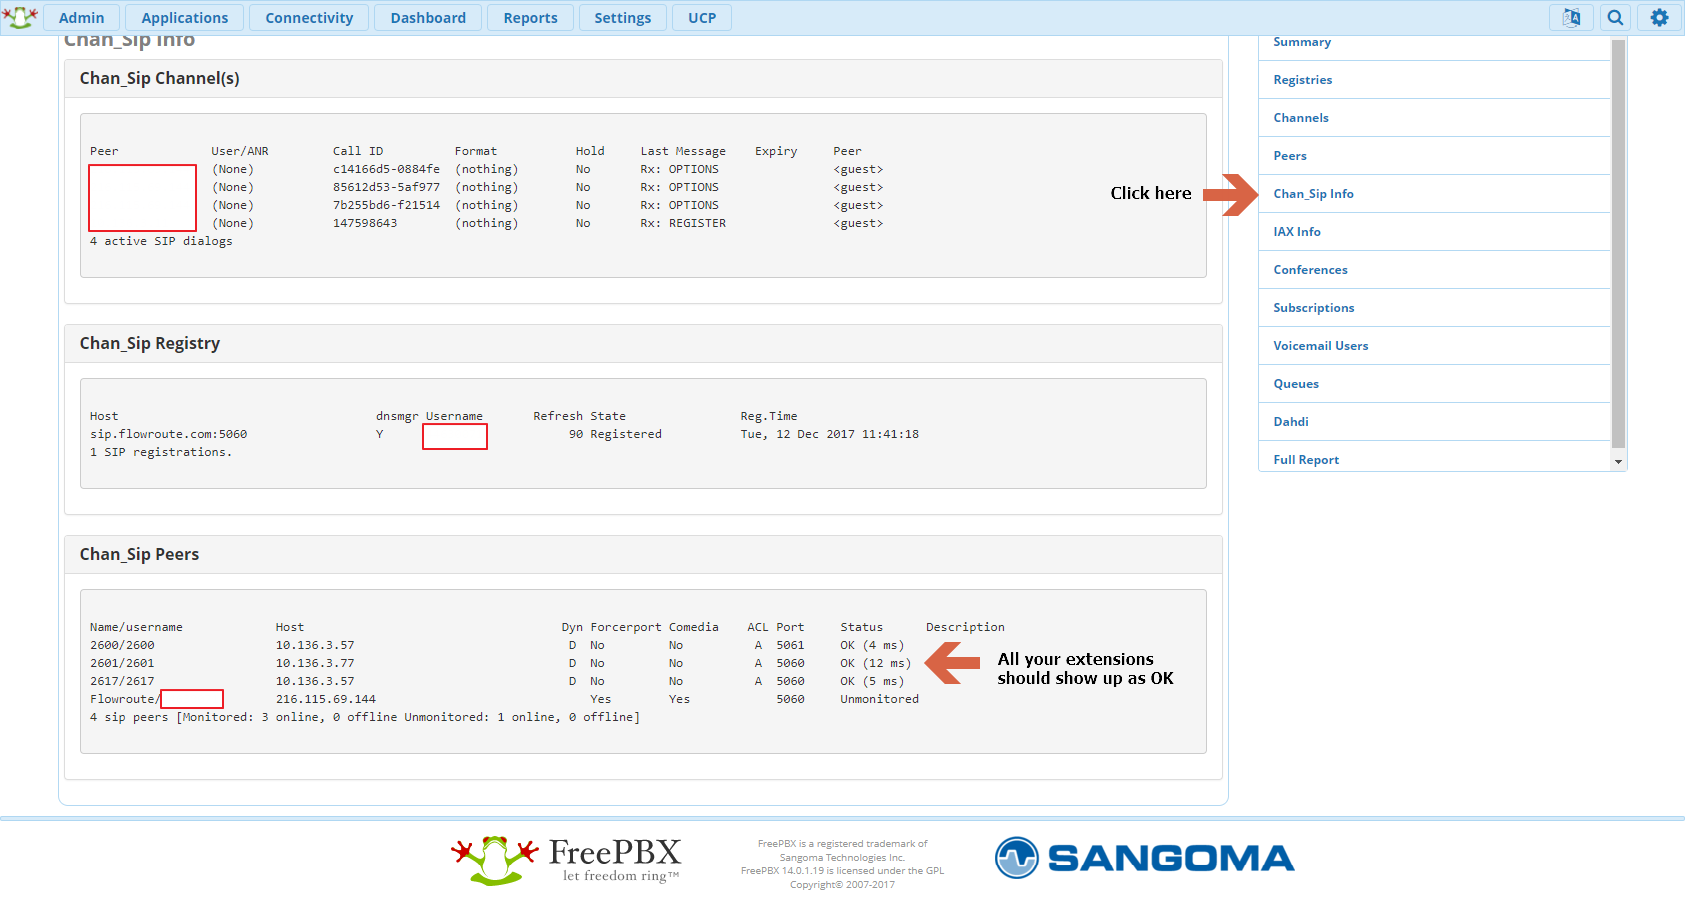
Finally, go to Reports / Asterisk Info and click Chan_Sip Info:
- Under Status in Chan_Sip Peers, all your extensions should show up as OK if already registered to a SIP phone.
Inbound Routes
To get a SIP Provider’s phone number to ring a phone, we’ll need to create an Inbound Route.
1.
Log into your PBX.
2.
Go to Connectivity / Inbound Routes.
3.
Click +Add Inbound Route:
- Description: I put in the SIP provider and the DID here
- DID Number: Enter the phone number your SIP Provider gave you.
- Set Destination: Choose Extensions and select the extension that will ring when this number is dialed.
- Click Submit when done.

Outbound Routes
To place a call that is not local to the PBX (an extension), we’ll have to make an outbound route to the SIP Provider.
1.
Log into your PBX.
2.
Click Connectivity / Outbound Routes
3.
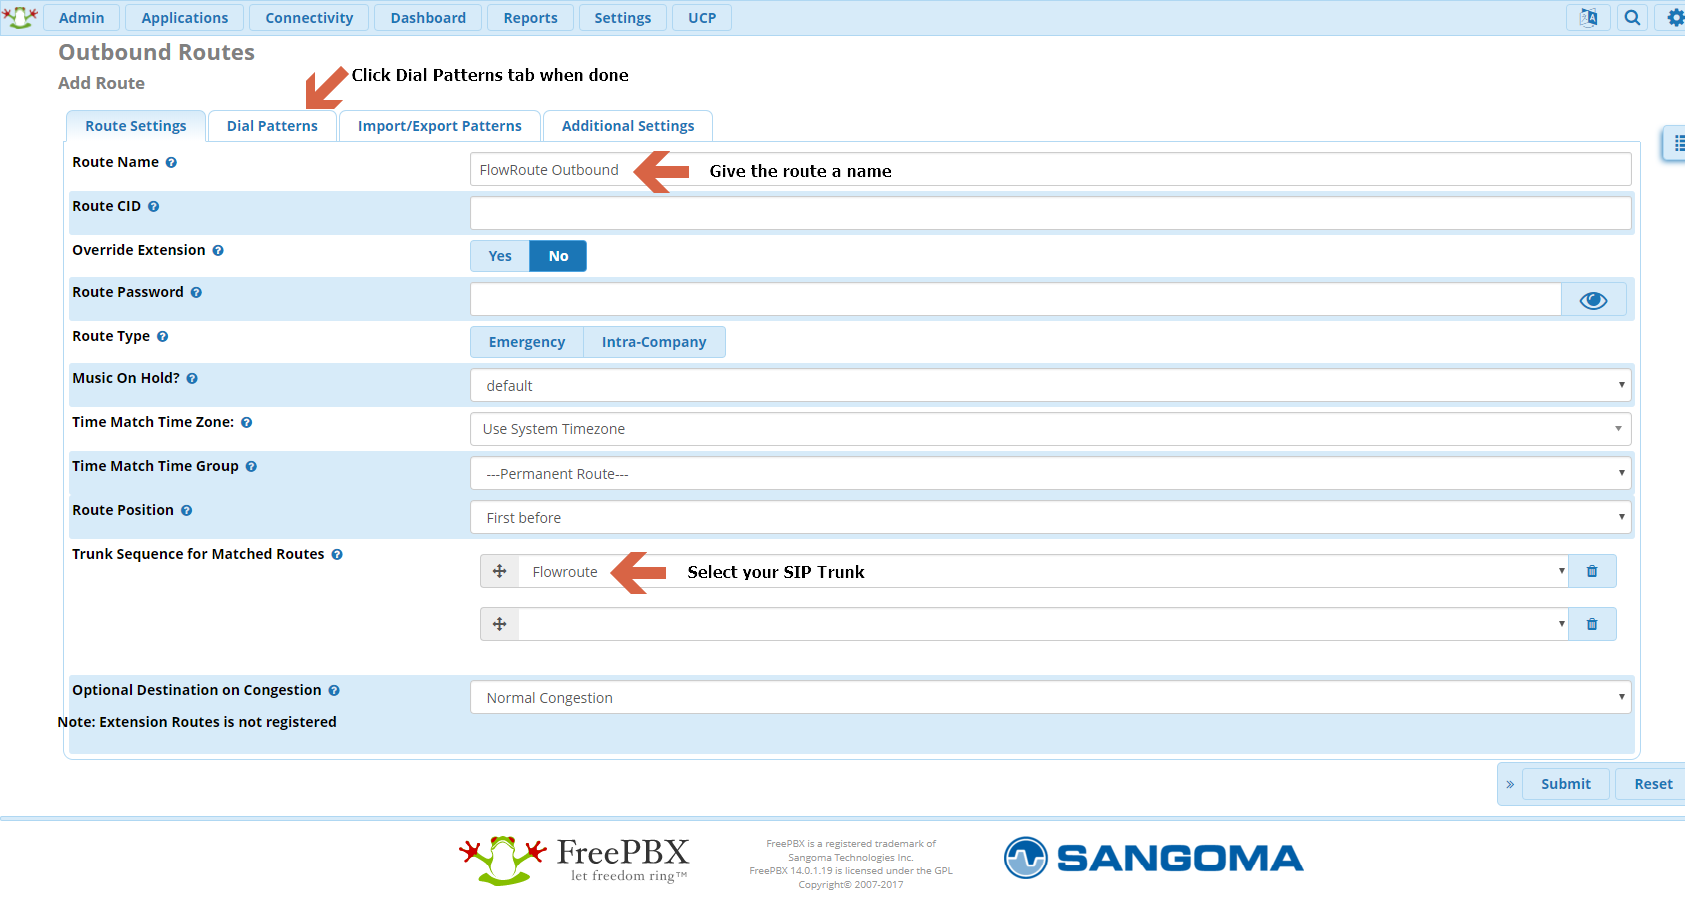
Click + Add Outbound Route:
- Route Name: Enter a route name
- Trunk Sequence Matched Routes: Select the trunk you made in the previous steps.
- Click Dial Patterns tab when done.
4.
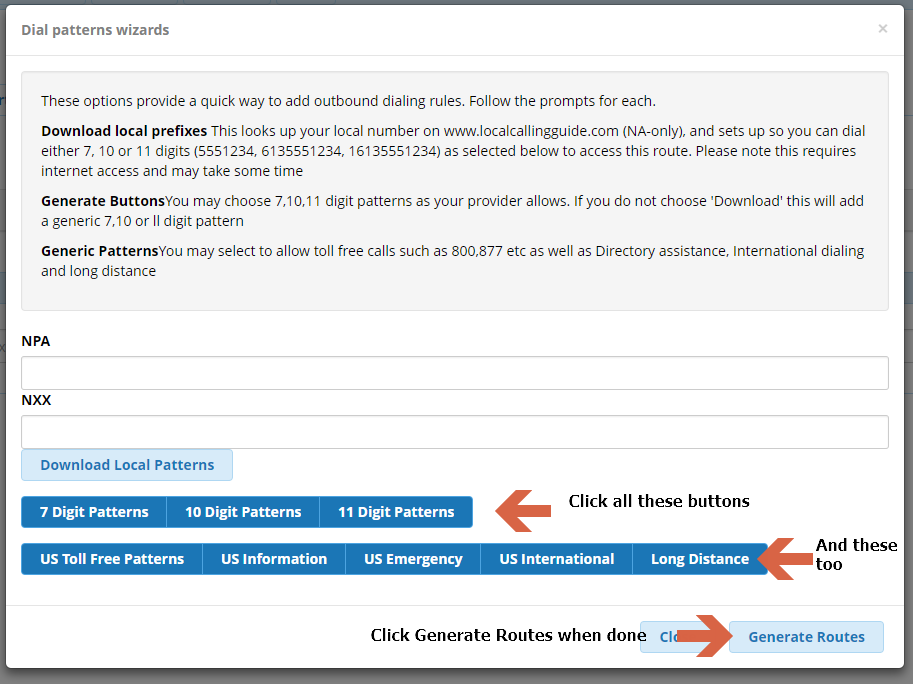
Click the “Dial patterns wizards” button and select all Digit Pattern and US buttons:
- Click all the Digit Patterns and US / Long Distance buttons.
- Click Generate Routes when done.
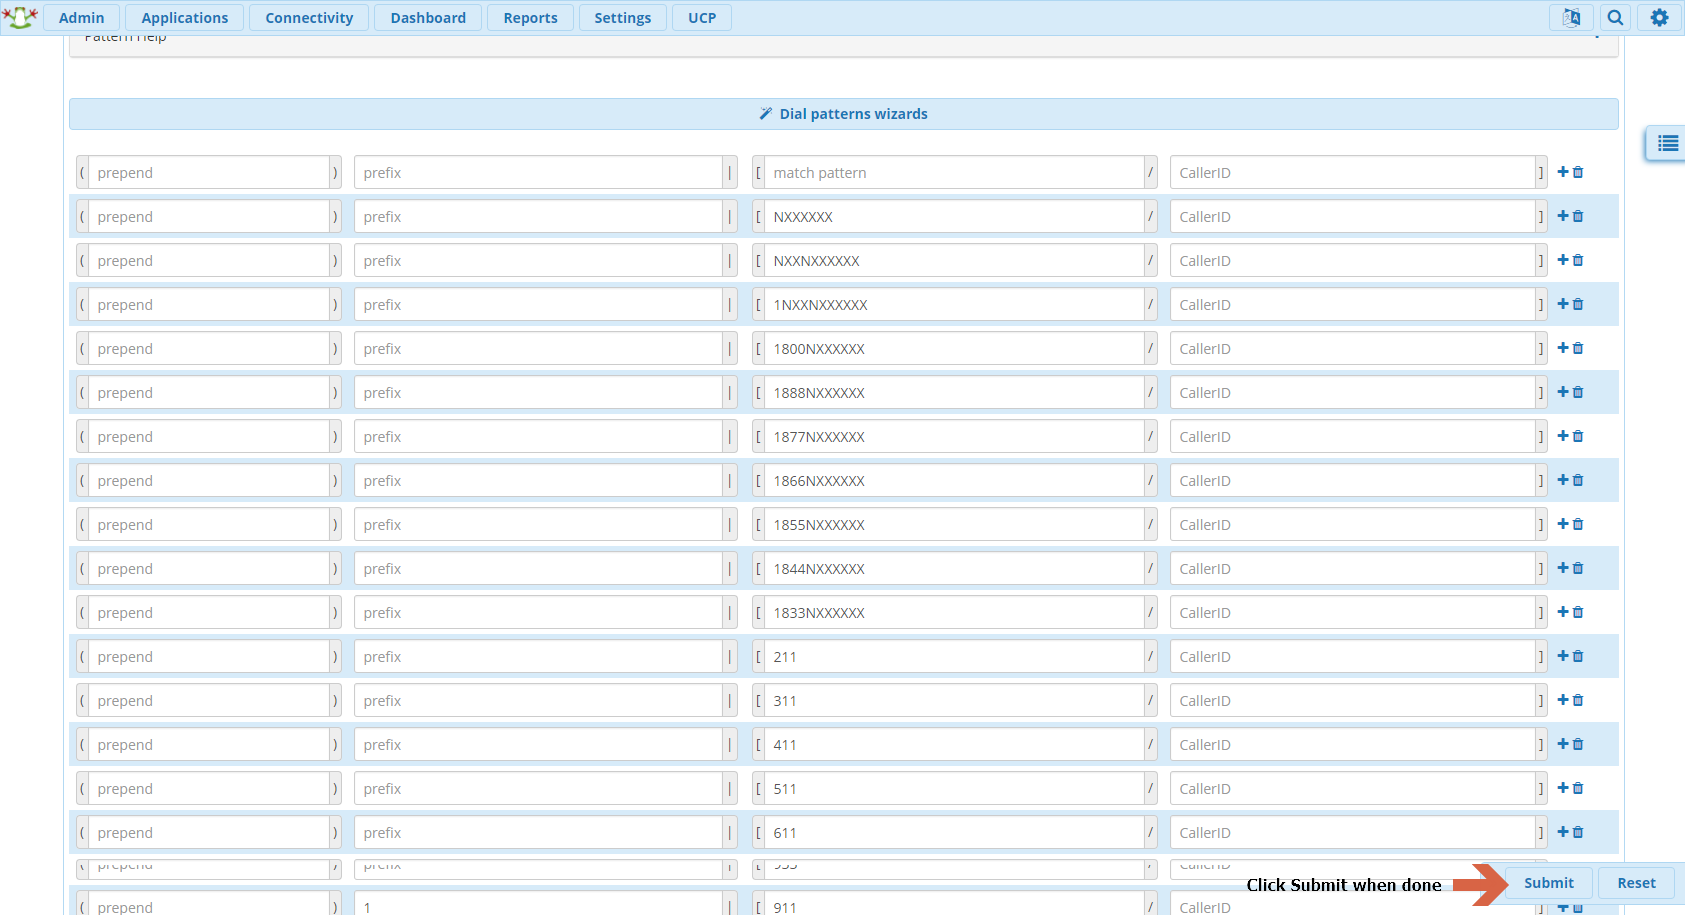
5.
You should see all the possible outgoing routes now, click Submit:
6.
Click Apply Config at the top right when you are done:
Now you should be able to receive and place calls using your SIP Provider.
That completes this tutorial.
test comment here